
See auxi in action
your workflows and save you time!
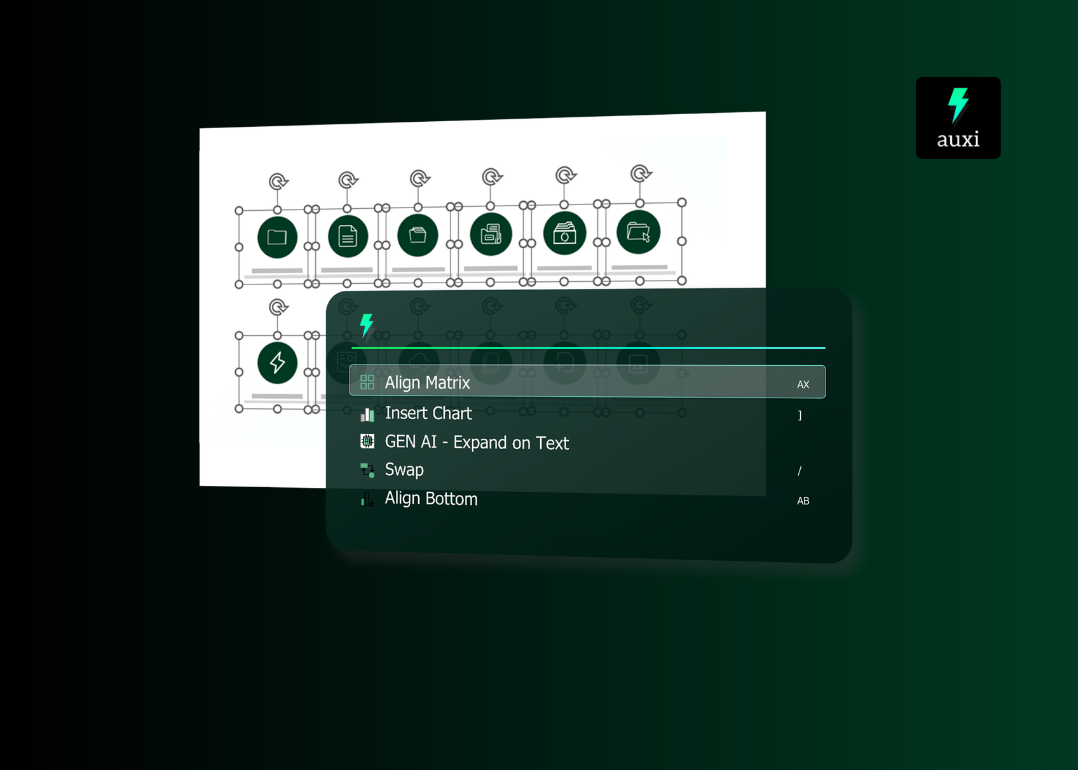
Aligning objects into a matrix (grid layout) in PowerPoint is one of the most time-consuming formatting tasks in slide production. A typical 3x4 comparison framework has 12 content boxes, each with a header, body text, and possibly an icon. That is 36+ objects that need to be evenly spaced, perfectly aligned, and identically sized. With auxi, you select the objects, press A+X, and the matrix is done in under 3 seconds.
The Manual Way
Building a matrix layout in native PowerPoint requires a sequence of repetitive steps.
You start by selecting all objects in the first row and using Align Top to get them on the same horizontal line. Then you manually drag or nudge each object to approximate equal horizontal spacing. You repeat this for every row. Then you select all objects in the first column and use Align Left to get them on the same vertical line. Repeat for every column.
At this point you have a rough grid. But the spacing between rows and columns is almost certainly uneven, because PowerPoint's native Distribute Horizontally and Distribute Vertically commands require you to select objects row by row or column by column. They do not work across a full grid in one operation.
For a 3x4 matrix, this process takes 15 to 25 minutes depending on how many objects are involved and how precise you need the result to be. If you need to change the grid layout later (say, from 3x4 to 4x3), you start over.
The auxi Way
Select all the shapes you want to arrange into a matrix. Press A+X. A grid selector pops up on your screen. Choose your preferred layout (2x2, 3x3, 3x4, 4x5, or any configuration). auxi arranges all selected objects into a perfectly spaced matrix instantly.
That is the entire process. Select, A+X, choose grid, done.
Customizing the Spacing
After the matrix is aligned, you can fine-tune the horizontal and vertical spacing without breaking the grid structure.
Keep the objects selected after alignment. Open the Smart Bar (Ctrl+Space on Windows, Cmd+L on macOS). The "Change Matrix Spacing" feature appears. Adjust the horizontal and vertical spacing values independently. The matrix updates in real time as you change the numbers.
This means you can go from a tight, compact grid to a wider, more spacious layout in seconds, without manually repositioning any objects. If the slide has more horizontal space than vertical, increase horizontal spacing. If you need to fit the matrix into a specific work zone, decrease both values until it fits.
When to Use Matrix Alignment
Matrix alignment applies to any slide where objects need to be arranged in a grid pattern. These are the most common scenarios in consulting and finance decks.
Comparison frameworks. A 3x4 or 4x4 grid comparing options, vendors, strategies, or capabilities. Each cell has a header and supporting text. Matrix alignment ensures every cell is identically sized and evenly spaced.
Team slides. Headshots with names and titles arranged in rows. Select all headshot groups (image + name + title), press A+X, and the entire team is organized into a clean grid.
Capability matrices. A grid showing which features or services apply to which segments. Headers across the top, categories down the left, content in each cell. Matrix alignment handles the entire layout in one operation.
SWOT and 2x2 frameworks. Four quadrants with equal sizing and spacing. Select the four boxes, press A+X, choose 2x2, and the framework snaps into place.
Icon grids. Six or nine icons with labels arranged in a visual overview. Without matrix alignment, getting these evenly spaced requires measuring and nudging each one individually.
Combining Matrix Alignment with Other auxi Features
Matrix alignment works well in combination with other formatting shortcuts.
Use Same Size (S+S) before running matrix alignment to ensure all objects are identically sized. The matrix alignment will space them evenly, but if the objects are different sizes, the grid will look uneven.
Use Same Width (S+W) or Same Height (S+H) if the objects should match on one dimension but not the other (for example, boxes that are the same width but different heights for varying text content).
After aligning the matrix, use Distribute Horizontally (D+H) or Distribute Vertically (D+V) if you want to adjust spacing in one direction only.
If you need to add a new column or row to the matrix later, use Add Column (Ctrl+2) or Add Row (Ctrl+3), which automatically resize all existing elements to accommodate the new addition.